How to use the Drupal Constant Contact Module

Overview
In 2019, Interactive Knowledge published a Drupal Constant Contact module that uses API version 3. We created this module because a client needed a module that used version 3 of the API and, because this particular project was a decoupled Drupal project, we needed to add a REST endpoint to allow users to sign up for a specific newsletter.
Last updated: March 1, 2024 (Latest Module Version 3.1.6 and up)
Here’s how to get started using our module for your own Drupal project.
First, download the latest version of the Constant Contact module. This module requires Drupal 8.9 or higher. Note that it’s preferred to use Composer to manage your modules. Read more about using Composer to manage Drupal site dependencies. Once you install the module, navigate to your Drupal site’s admin at /admin/config/services/ik-constant-contact
Next, log into the Constant Contact Developer applications dashboard. If you don’t have one already, create a Constant Contact account. Once you are logged in, select the ‘New Application’ button.

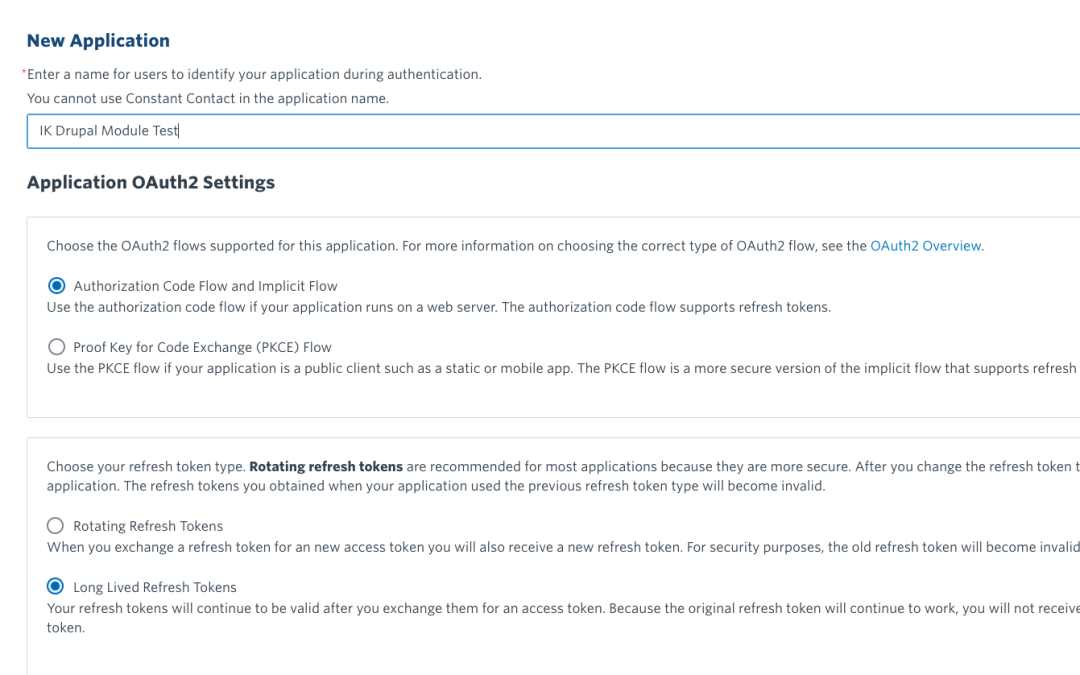
Name your application, select the Authorization Code Flow and Implicit Flow. Then, select Long Lived Refresh Tokens from the Application OAuth2 Settings and select ‘Save’.
Note: There seems to be an issue with the tokens expiring and not being able to be validated again. See issue for more information. At this time, it's recommended to choose Long Lived Refresh Tokens for your applications.
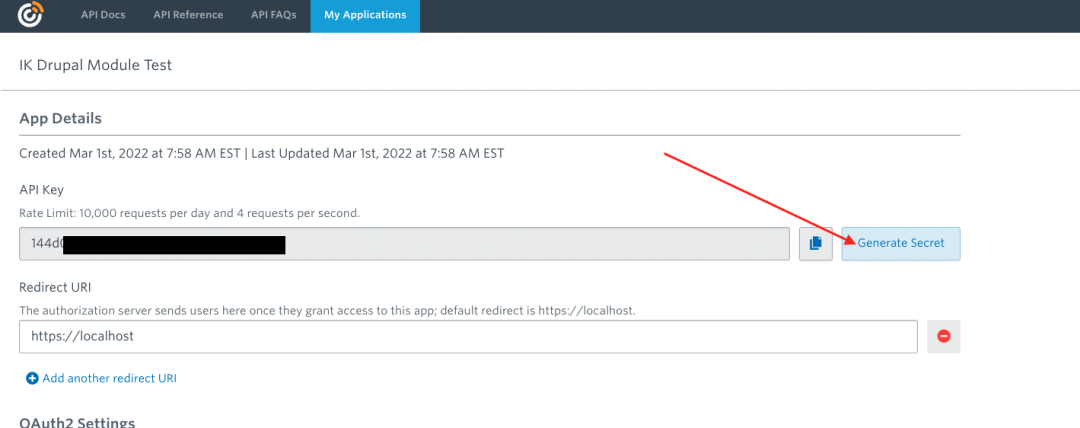
This will direct you to the application detail page. Here, you’ll want to copy and save your API Key for later.
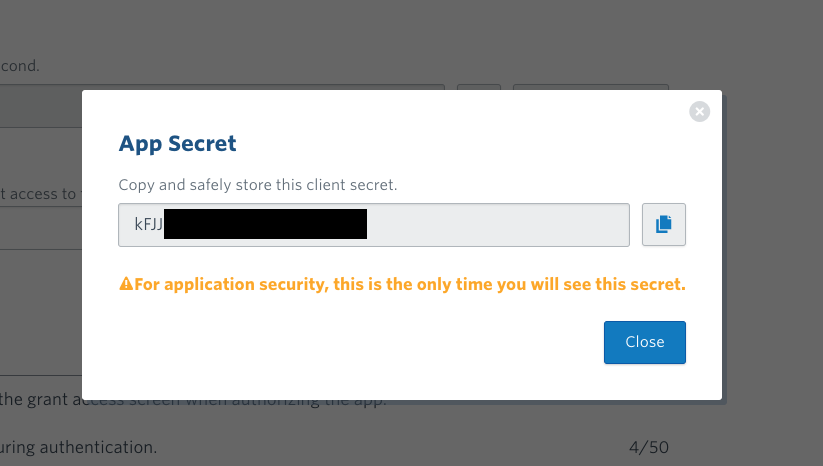
If you chose Authorization Code Flow and Implicit Flow for your application, you’ll click the ‘Generate Secret’ button and copy and save that as well. (Make sure you save this secret as it will only show you once.)
To configure your newly created application, add one of the following code examples based on the type of application you created to your settings.php file and update with your credentials from your newly created application:
If you utilize different environments for development, it is highly recommended to make a different API application for each environment so there is no issue with tokens crossing differing environments.
You can also copy and paste your API Key and Secret into the admin form provided on the Drupal site admin at /admin/config/services/ik-constant-contact.
Once you’ve saved the API key and client secret, refresh the admin page. Add the Redirect URL listed in your Constant Contact application, and select the ‘Authorize Your Account’ button.
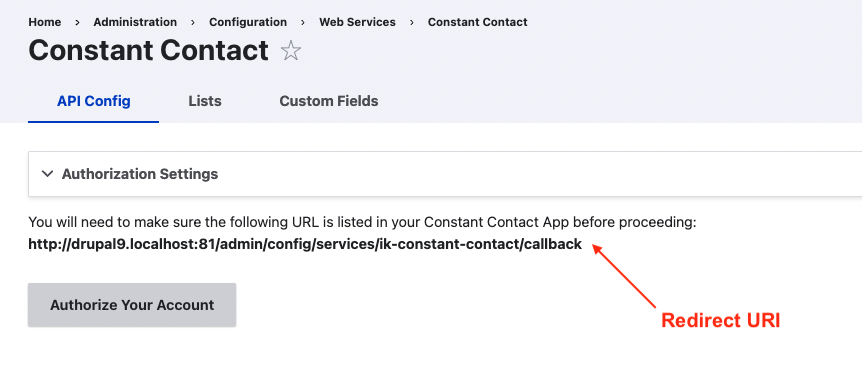
Copy and paste the redirect URL provided into the Redirect URL section of your Constant Contact application information and select ‘Save’. (Make sure you’ve matched the proper environment URLs with the correct API key).

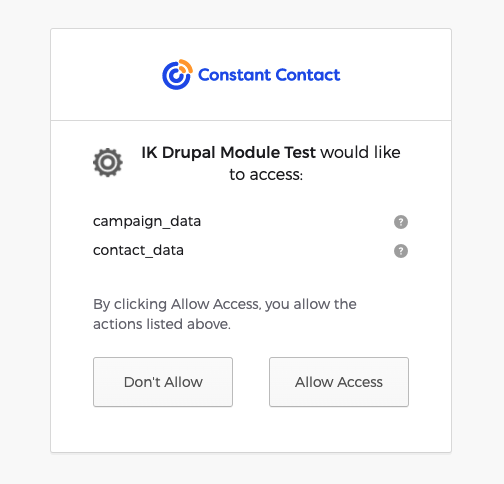
After saving the Redirect URI, you can select the ‘Authorize Your Account’ button from your Drupal site, then select ‘Allow Access’ to grant access to your Constant Contact account.
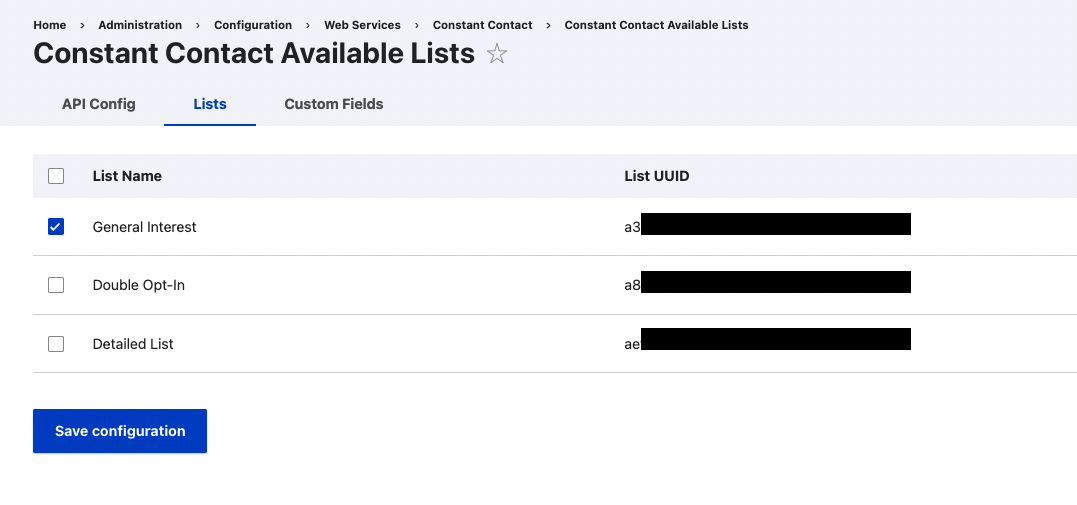
You should then see a success message that the Tokens were successfully saved. Select the Lists tab and all lists on your Constant Contact account will show. (If you have a newly created account you may need to create a list). Check each list you want to have available for users to subscribe to and click Save.
After saving, clear your Drupal site cache (/admin/config/development/performance).
Note that API tokens are refreshed whenever the Constant Contact API is called. However, to keep the access tokens active, it’s recommended to enable the system cron to automatically run at least every 8 hours. This will eliminate the need to manually generate tokens.
Now, you can use Blocks, Entities or Webforms to allow users to seamlessly sign up for enabled lists.
Use Blocks and Block Layout for list signups
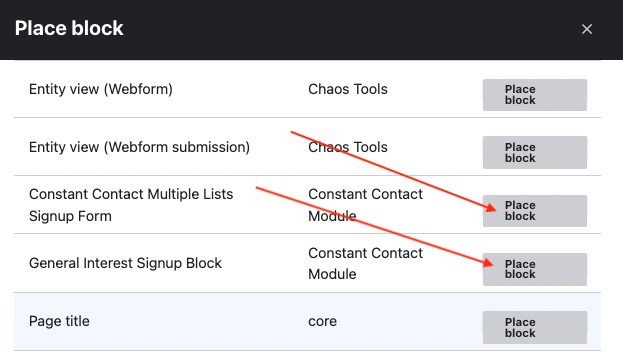
Navigate to your Block Layout page (/admin/structure/block). Here, you may place a block into your site layout for each enabled list or select the multi-list signup form.
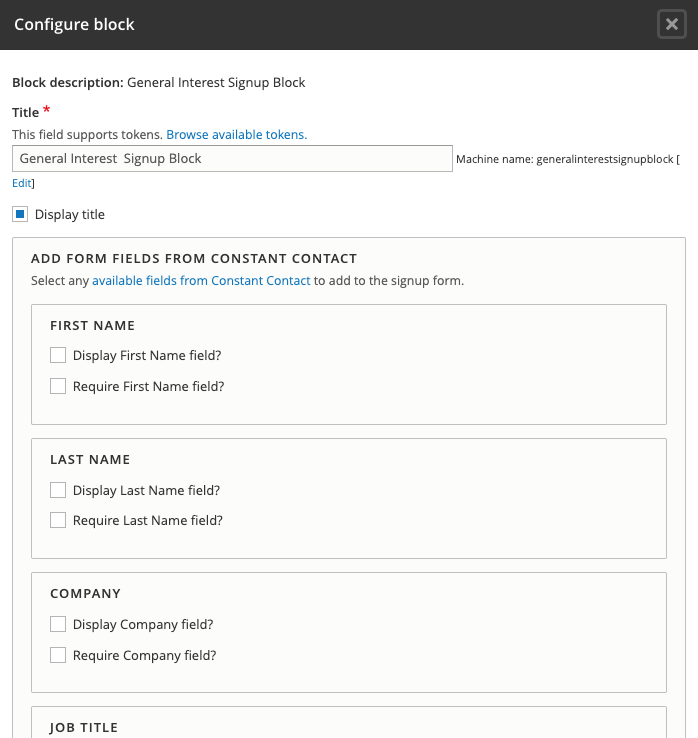
Each block contains a form to allow users to sign up for the associated Contact Contact list. Once you place the block, you may adjust the settings to show, hide or require certain fields. If you prefer, you can set a custom Success Message that will display after a user successfully subscribes to a list. For more information on setting up custom fields in Constant Contact, read their documentation. Note that if you have any date custom fields, you will need to enable the Datetime module to use them.
Use Content Entities for list signups
In this example, we’ll use the User entity. However, the following steps can be used on any content entity type.
Navigate to your entity’s field configuration form. Click Add field. Select the Constant Contact Lists field type.
In the field settings, you can allow subscribe/unsubscribe options on entity create/save/update/delete. Note that checking this will also require an email field on the entity.
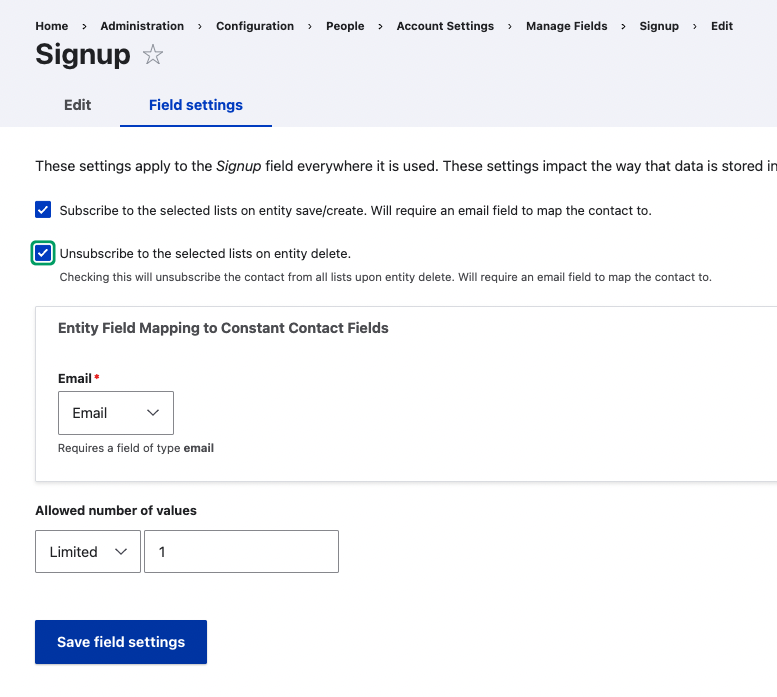
Finish form and display configuration for the entity.
Use a Webform for list signups
To use Webforms to handle user signups, create a webform that has at least 1 email field and at least one of your Constant Contact lists enabled.
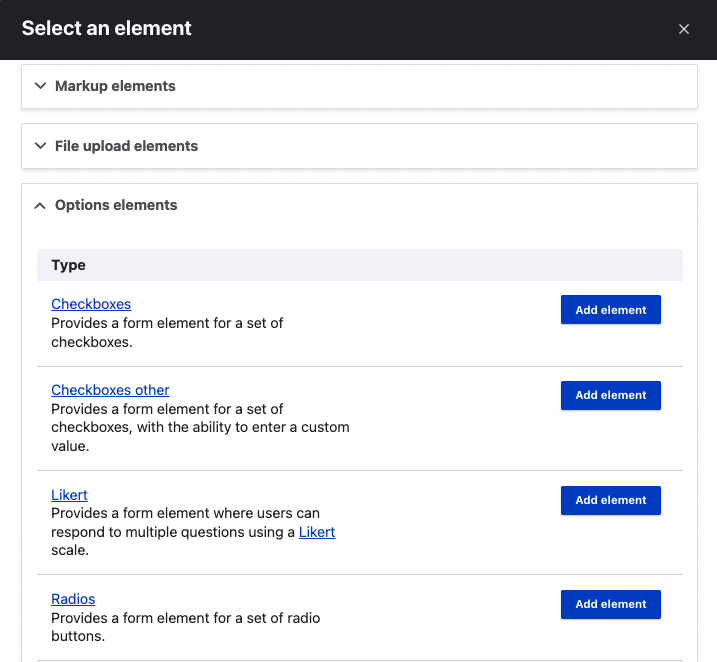
To use a form element to allow users to select a list or lists to subscribe to, click Add element and select an Option type element. (Ex: Checkboxes, List, etc)
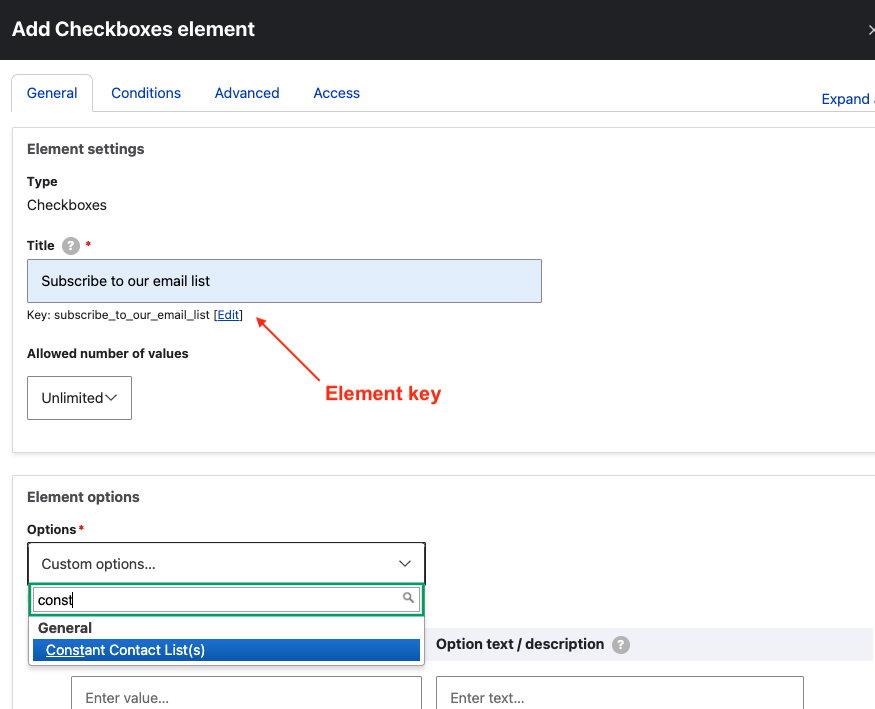
Add a title, and select “Constant Contact List(s)” from the predefined options list. Make note of the element’s key.
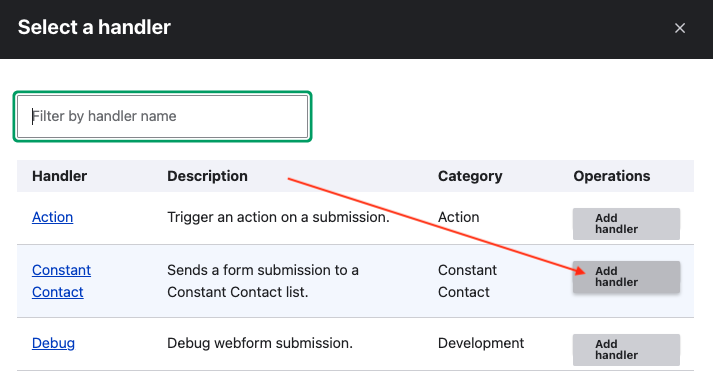
Then navigate to your webform settings tab and select Emails/Handlers.
Click Add Handler and select the Add handler button next to Constant Contact.
Then under settings, select the List to send signups for the form to or to use a field from the webform submissions, select Other… and add the webform submission token.
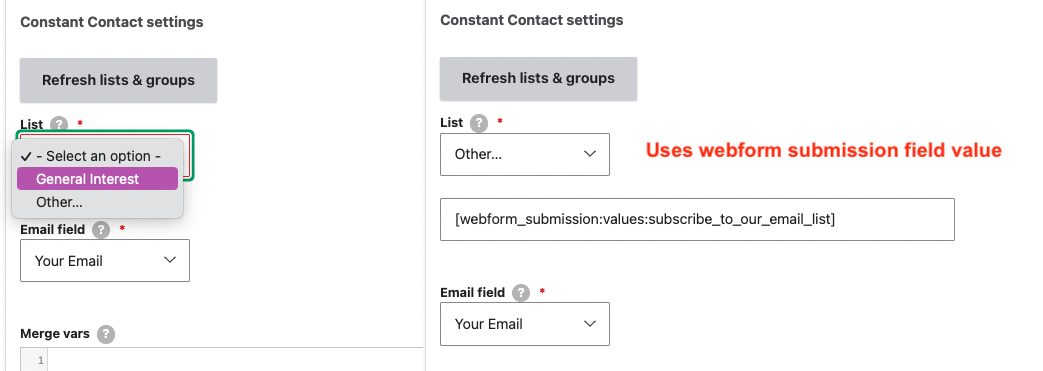
Select the email address field.
You can also use the Merge vars field to add additional information from the webform submission. Each field should be on a new line and the field handles the input like a yaml file. Below is an example of how you could add some values using webform tokens.
first_name: "[webform_submission:values:first_name_field]"
last_name: "[webform_submission:values:last_name_field]"
street_address:
  city: "[webform_submission:values:city_field]"
  state: "[webform_submission:values:state_field]"
custom_fields:
  00a00000-b00c-00de-f00g-hi000jk0l00m: "[webform_submission:values:my_custom_field_name]"
The custom_fields value requires an array of key/value pairs. The key being the custom field's UUID from Constant Contact and then the value for the custom field to be submitted.
Constant Contact fields currently supported are:
- first_name
- last_name
- company_name
- job_title
- phone_number
- street_address
- street
- city
- state
- postal_code
- country
- birthday_month
- birthday_day
- anniversary
- custom_fields
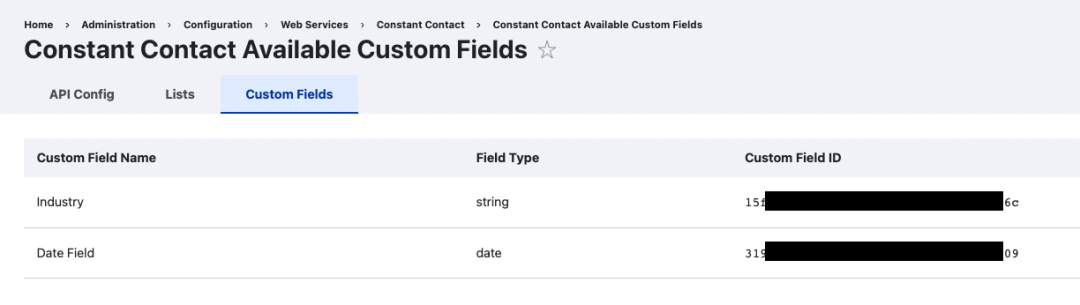
To find custom fields UUID, navigate to your Drupal site /admin/config/services/ik-constant-contact/fields to view a list of your custom fields. Note that the date module will need to be installed to use any date field types.
Enable and use a REST endpoint for your signups
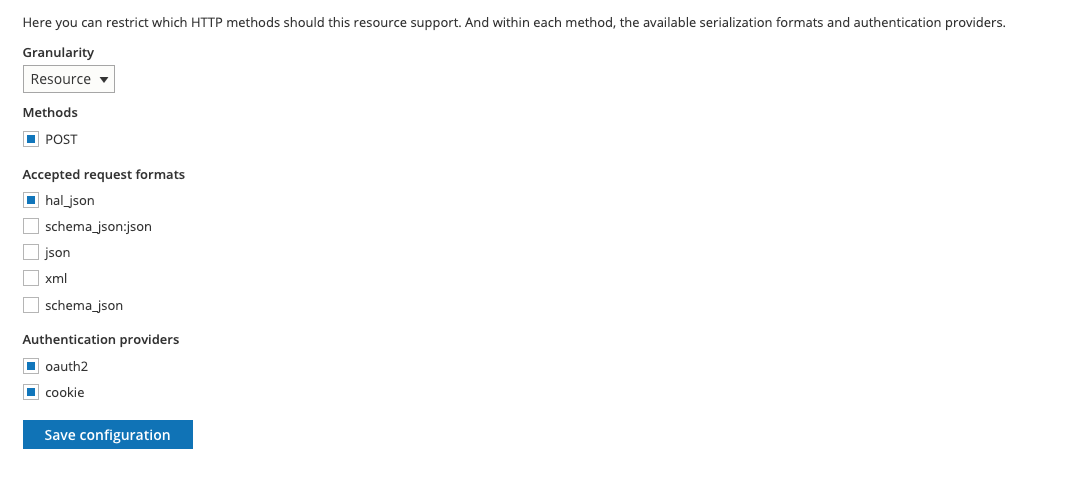
To enable a REST endpoint for your list, you’ll need to have the RESTful Web Services and REST UI modules enabled. Then, navigate to the REST UI admin interface located at your Drupal site (/admin/config/services/rest), scroll down to the IK Constant Contact Resource and select ‘Enable’. Make sure to enable the ‘POST’ method and the Format and Authentication you prefer.
Then, navigate to your User Permissions (/admin/people/permissions) and enable the appropriate User Roles. For example, if you want all users who visit your site to be able to sign up for a form, you’ll need to enable the Anonymous User Role for the Access POST on IK Constant Contact resource.

Congratulations, you now can create a custom form on your front-end that will post to your constant contact list! The endpoint will be located at your Drupal site at the URL /constant_contact/listid but replace ‘listid’ with the ‘listid’ located in the Constant Contact Drupal site admin page. (/admin/config/services/ik-constant-contact/lists). For example, if your contact list ID is 00000000-0000-0000-0000-000000000 your POST endpoint would be /constant_contact/00000000-0000-0000-0000-000000000.
For more about using authorization methods, see documentation for Simple OAuth module or use a session cookie RESTful Web Services CSRF Tokens.
Update to new authentication system (March 31, 2022)
As of March 31, 2022, Constant Contact is requiring all apps to update to a new authentication service. The following are instructions on how to upgrade your Drupal site for this change.
First, download the latest release of the Constant Contact Module (3.x or higher).
Next, log into your Constant Contact Applications page and create a new application and select the authorization Authorization Code Flow and Implicit Flow and Long Lived Tokens from the Application OAuth2 Settings and select ‘Save’.

Add your site's Redirect URI to the new application, and generate a new application secret.
Lastly, Update your site's settings.php file with the new application information and clear Drupal's site cache. After the cache is cleared, click Refresh Tokens Manually. This will prompt you to authorize access to your Constant Contact account again. Select Allow Access and new tokens will be saved.
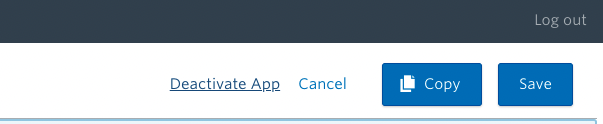
After your new application is set up, go back to your Constant Contact applications and select the old application. Once in the application, click Deactivate App.
That's it!
Did you know that Interactive Knowledge has a few other Drupal.org modules our team maintains? Check them out for your Drupal project here:
- Modal Management Module
Creates a custom entity to be able to show modals to users based on date or location. - AbuseIPDB Module
This module provides connection to the AbuseIPDB database. - Automated Crop
Automatically crop media image entities using Crop API.